18.97.14.86 - United States, Cambridge
laptop

How to setup OpenVPN on Windows 7

The following step-by-step guide will help Windows 7 users to setup a VPN-connection via OpenVPN protocol. There is nothing complicated, simply repeat all the actions exactly how they are shown in the images below. In a few minutes you will be able to visit your favorite websites anonymously, unlock access to Facebook and user free Wi-Fi without any risk of hackers being able to track your actions online.
1
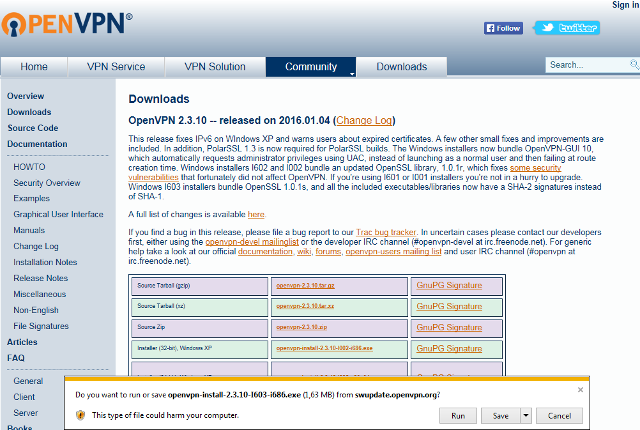
Download the latest version of OpenVPN client from the official site openvpn.net. Run the program installer.
Next
Setting up OpenVPN on Windows 7, step 1 Setting up OpenVPN on Windows 7, step 1
2
Click Yes to allow installation.
Next
Setting up OpenVPN on Windows 7, step 2 Setting up OpenVPN on Windows 7, step 2
3
In order to start installation click Next.
Next
Setting up OpenVPN on Windows 7, step 3 Setting up OpenVPN on Windows 7, step 3
4
Accept the License Agreement terms by clicking I Agree.
Next
Setting up OpenVPN on Windows 7, step 4 Setting up OpenVPN on Windows 7, step 4
5
Click Next to install a standard set of components.
Next
Setting up OpenVPN on Windows 7, step 5 Setting up OpenVPN on Windows 7, step 5
6
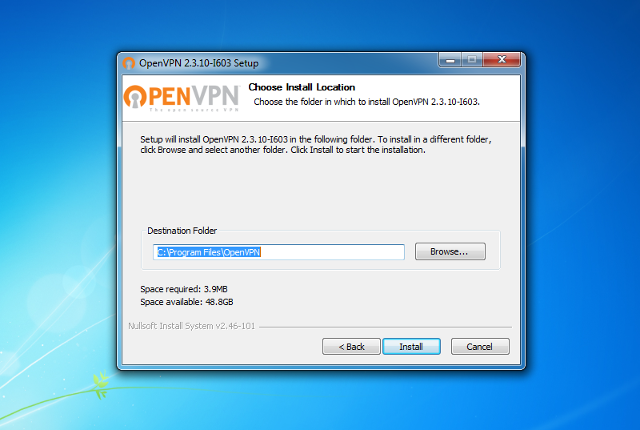
Specify a folder for program installation and press Install. It is recommended to install the program to the folder offered by default.
Next
Setting up OpenVPN on Windows 7, step 6 Setting up OpenVPN on Windows 7, step 6
7
Press Install in the Windows Security Window asking to install the network adapter driver.
Next
Setting up OpenVPN on Windows 7, step 7 Setting up OpenVPN on Windows 7, step 7
8
Click Next and Finish to complete the installation.
Next
Setting up OpenVPN on Windows 7, step 8 Setting up OpenVPN on Windows 7, step 8
9
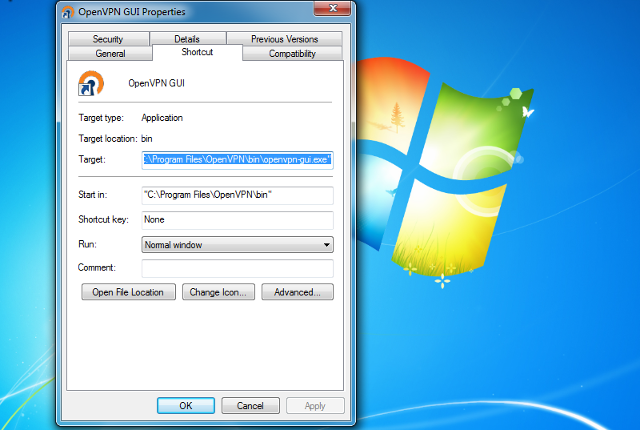
Right-click on OpenVPN GUI icon and select Properties.
Next
Setting up OpenVPN on Windows 7, step 9 Setting up OpenVPN on Windows 7, step 9
10
Click Advanced... in appeared window.
Next
Setting up OpenVPN on Windows 7, step 10 Setting up OpenVPN on Windows 7, step 10
11
Select item Run as administrator and click OK.
Next
Setting up OpenVPN on Windows 7, step 11 Setting up OpenVPN on Windows 7, step 11
12
Click Continue to complete.
Next
Setting up OpenVPN on Windows 7, step 12 Setting up OpenVPN on Windows 7, step 12
13
After paying the order you will receive by email an archive with configuration files. Extract the files with .ovpn extension from this archive and place it to config folder in catalogue with the program installed (by default it is C:\Program Files\OpenVPN\config).
Next
Setting up OpenVPN on Windows 7, step 13 Setting up OpenVPN on Windows 7, step 13
14
Click Continue in appeared window.
Next
Setting up OpenVPN on Windows 7, step 14 Setting up OpenVPN on Windows 7, step 14
15
To establish VPN-connection run the OpenVPN GUI application. Press Yes in the appeared User Account Control window.
Next
Setting up OpenVPN on Windows 7, step 15 Setting up OpenVPN on Windows 7, step 15
16
Right click on OpenVPN icon from System tray, go to desired server and select Connect.
Next
Setting up OpenVPN on Windows 7, step 16 Setting up OpenVPN on Windows 7, step 16
17
After successful connection an OpenVPN icon will become green.
Next
Setting up OpenVPN on Windows 7, step 17 Setting up OpenVPN on Windows 7, step 17
18
To break VPN-connection right-click on OpenVPN icon, go to active server and select Disconnect.
To top
Setting up OpenVPN on Windows 7, step 18 Setting up OpenVPN on Windows 7, step 18

Registration


E-mail
Language
Password
Confirm Password

Support and Feedback